

Showing posts with label DIY. Show all posts
Showing posts with label DIY. Show all posts
Wednesday, October 9, 2013
Chalkboard paint project #1,578,489,458.....
Lots of chalkboard paint projects out there, and that's because it's wonderful! I painted the front of my pantry with it and write our dinner menu and a fun quote or verse of the day. It's provided inspiration and accountability (as in I have to follow thru with what the menu says I'm making).


Wednesday, September 18, 2013
Breaking a Broody Hen?
A few weeks ago I noticed that one of our chickens was not leaving the nesting boxes. When I went to reach for the eggs she puffed up her feathers and made a weird growling sound at me. I was watching throughout the day and realized this wasn't normal behavior. I started doing some research and read that she could be broody which basically means she wants to sit and protect her eggs in hopes of hatching them. The downside for one is that since we don't have a rooster (thank goodness) our eggs will never turn into little baby chicks no matter how long a mamma hen sits on them so they are just wasting their time. They can sit there for 3 weeks or more! That means we would be missing out on her egg production and we would have a nasty chicken to deal with!
In my research I read that in order to break a broody hen you need to address it within the first 2 days you notice that it got all broody on you. I read of various different methods and decided on a "broody breaker". The idea is that you need to cool down her chest (it got warm from sitting all day and night) in hopes of her returning to her normal chicken self. A "broody breaker" is some sort of cage that allows for air circulation, where she is away from the other chickens, and with no nesting boxes.Different websites I read recommended a rabbit cage but I didn't want to spend money on this little experiment, so I looked around for what we had that I could use.
I came up with a pallet (I've been collecting them for some projects), left over chicken wire from building the coop, and old fence posts (we just redid part of our fence). My parents were visiting so I had my dad help.
Here she is looking all normal

Here she is puffing her feathers up at my dad

I think from the picture you can see how we constructed the "broody breaker". Pretty self explanatory. Totally Scrappy Love style!

Yes, I wore gloves to move her. I'm not that much of an animal person and I read they can be pretty nasty if you try to handle them while they are brooding.

There she is. Not to happy about it.
 The first day she got out b/c we didn't put a cover over the top so my husband just put her back in with all the other chickens that night. Well, when I went out the next day she was right back to sitting in the nesting boxes, puffing her feathers up, and squawking at me. I put her in the box, covered it up and left her in there for about 3 days. After that we put back in the coop with the rest of the chickens and she was cured! Yes!
If you have a broody chicken on your hands just google "broody hens" and it will come up with tons of information. I hope this helps someone dealing with their chickens.
In my research I read that in order to break a broody hen you need to address it within the first 2 days you notice that it got all broody on you. I read of various different methods and decided on a "broody breaker". The idea is that you need to cool down her chest (it got warm from sitting all day and night) in hopes of her returning to her normal chicken self. A "broody breaker" is some sort of cage that allows for air circulation, where she is away from the other chickens, and with no nesting boxes.Different websites I read recommended a rabbit cage but I didn't want to spend money on this little experiment, so I looked around for what we had that I could use.
I came up with a pallet (I've been collecting them for some projects), left over chicken wire from building the coop, and old fence posts (we just redid part of our fence). My parents were visiting so I had my dad help.
Here she is looking all normal

Here she is puffing her feathers up at my dad

I think from the picture you can see how we constructed the "broody breaker". Pretty self explanatory. Totally Scrappy Love style!

Yes, I wore gloves to move her. I'm not that much of an animal person and I read they can be pretty nasty if you try to handle them while they are brooding.

There she is. Not to happy about it.

If you have a broody chicken on your hands just google "broody hens" and it will come up with tons of information. I hope this helps someone dealing with their chickens.
Tuesday, August 27, 2013
Large Print on a Budget
I had a picture of the twins and our dog that I wanted in a large print but it can be pricey when you add having to buy a large frame to go with it. I had seen different ways of making large prints on Pinterest and so I combined a few to make it my own. I was given a coupon to use at Shutterfly which allowed me to get a large print for free! I just had to pay for shipping.
Here is the steps I did to get what I was looking for.
So the total for this project was about $6. ($1 for the board and $5 for shipping)
*If I did this again, I would be more careful putting the modge podge under the picture. As it dried it bubbled up some which you can tell in person but not in the pictures. So, watch for that if you do this project.
Here is the steps I did to get what I was looking for.
 |
| I bought a cardboard sheet at the Dollar Store to use as my "frame" |
 |
| I used this to stick the picture to the cardboard |
 |
| I used my photo albums to put weight on the picture while it dried |
 |
| Finished project! |
 |
| I'll hang it eventually, but for now it's just leaning and I'm happy with that |
*If I did this again, I would be more careful putting the modge podge under the picture. As it dried it bubbled up some which you can tell in person but not in the pictures. So, watch for that if you do this project.
Wednesday, July 31, 2013
'Honey-do'
Our very busy season is over which means Andy wants to start right into his 'Honey-do' list. Husbands am I right? I just know they are saying yes(=. So here's what is at the top of mine!
1. A new roof. Lord help us, the shingles are literally curling, that can't be good. I'm thinking of having a roofing party-think barn raising, where all our friends come and I feed them! Of course bonfires at night with wives and kids.
2. A new bathroom- Here's my dream hon.
 |
| This roof looks like it would be quick and painless to put on... |
2. A new bathroom- Here's my dream hon.
 |
| Wood floors, claw foot tub, bright and cheery! |
3. Freshen/ make-over the laundry room. I like how bright this one is!


4. A loft bed for the girls and bunk bed for the boys is on the horizon!
 |
| I also love the ideas of built-ins to save on space! |
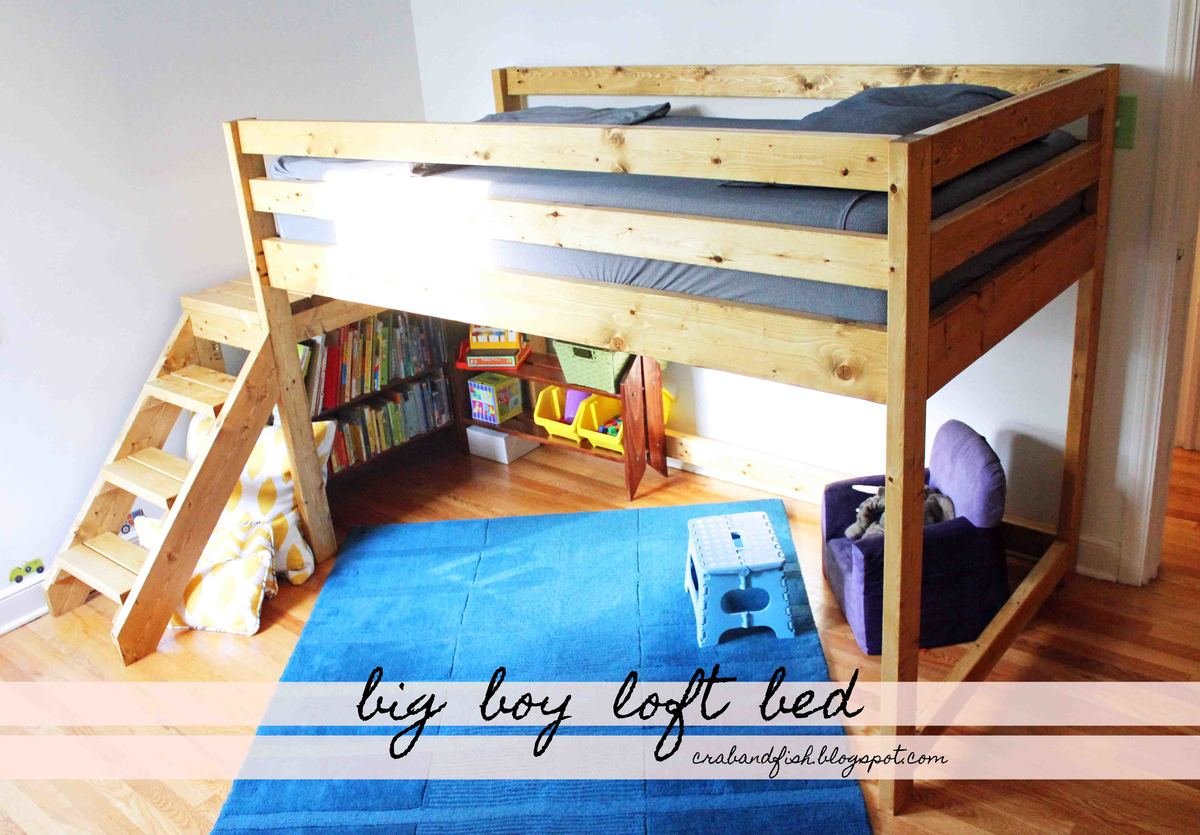 |
| We love Ana White for designs! |
Thursday, July 25, 2013
Fabric Scraps Project #1
I'm going to start a series on "what to do with scrap fabric". It's one of my favorite things to do...make something out of leftover fabric from another project. A lot of us make some sort of fabric craft and are then left over with scraps. Instead of throwing them away, keep them for a later project! They can be really little pieces too by the way. It also makes you feel like you are doing a new project for free since you don't have to go get more materials, which I LOVE. (hence the name ScrappyLove)
Project #1 Scrappy Strips Banner
If you are having a party or little gathering of some sort and want to decorate but not spend a lot of time or money, go check out your fabric scrap stash and see if you can whip up a Scrappy Strips Banner. All you need is to cut strips in whatever widths you want and then tie them onto some sort of rope. I used twine here, but you could use ribbon or yarn too.
This one was for a Fourth of July cookout so I went with reds, blues, and whites. Classic! It also served as a gift for the host!


You can tell from the picture that my widths are all different and also different lengths. It's pretty Scrappy, but that's my style. If you like a much more put together look then just make sure all your strips are the same size and maybe iron your strips as well before you tie them on.
I've made these before for baby showers, as Valentine's decorations for the mantel, and to drape up the stairs during the Christmas season. Another good idea is if you are going to have a family photo shoot and want to add a prop, just make one of these and hang it behind your during your photo session.
If you would rather not make one, there is currently a Valentine's Day one in the Etsy shop if you are interested.
How do you use your scraps?? I'm always looking for new ideas!
Project #1 Scrappy Strips Banner
If you are having a party or little gathering of some sort and want to decorate but not spend a lot of time or money, go check out your fabric scrap stash and see if you can whip up a Scrappy Strips Banner. All you need is to cut strips in whatever widths you want and then tie them onto some sort of rope. I used twine here, but you could use ribbon or yarn too.
This one was for a Fourth of July cookout so I went with reds, blues, and whites. Classic! It also served as a gift for the host!


You can tell from the picture that my widths are all different and also different lengths. It's pretty Scrappy, but that's my style. If you like a much more put together look then just make sure all your strips are the same size and maybe iron your strips as well before you tie them on.
I've made these before for baby showers, as Valentine's decorations for the mantel, and to drape up the stairs during the Christmas season. Another good idea is if you are going to have a family photo shoot and want to add a prop, just make one of these and hang it behind your during your photo session.
If you would rather not make one, there is currently a Valentine's Day one in the Etsy shop if you are interested.
How do you use your scraps?? I'm always looking for new ideas!
Wednesday, July 24, 2013
Sneak Peek - Wood Floors
Remember we replaced the old nasty carpet a few weekends ago with hard wood? Well, they look awesome and my husband did a great job! They aren't quite finished. A few touches here and there plus sanding and putting a clear protective coat down. So I won't give you the full view until it is completely done and decorated!
Before...

After...

Before...
After...
Friday, July 5, 2013
Next House Project

Wood floors are about to go down in our family room to replace the really old/stained carpet that was there. Pretty excited about this project. More exciting then the last (jacking up the garage wall to replace rotten wood so it wouldn't fall over)
Monday, July 1, 2013
DIY - Plastic Flower Pot Facelift
I planted some wild flower seeds I was given in these plastic pots that once held perennials that I planted into the flower bed in front of our house
 But I thought they were really ugly and boring, especially because there weren't any flowers in them yet, so I added fabric to them! Easy and simple fix!

I just tied them on just incase I changed my mind and wanted the fabric back.

I think once all the wild flowers bloom in them, they will be really pretty, if they survive the chickens and the 2 year olds!
I just tied them on just incase I changed my mind and wanted the fabric back.
I think once all the wild flowers bloom in them, they will be really pretty, if they survive the chickens and the 2 year olds!
Thursday, June 27, 2013
Scrappy Banner
A few weeks ago I posted these blankets to the Etsy store and shared them on FB.


Soon after I got a special order request from a friend to make 2 banners, one boy themed, and one girl themed, to use as a photography prop. I quickly got to work with fabric I already had from past projects and mailed them out to her. Thankfully, she loved them!


In my opinion, adding a banner to anything makes it look better! I'm planning on making more of these and adding them to the Etsy shop soon. Let me know if you are interested!
Soon after I got a special order request from a friend to make 2 banners, one boy themed, and one girl themed, to use as a photography prop. I quickly got to work with fabric I already had from past projects and mailed them out to her. Thankfully, she loved them!
In my opinion, adding a banner to anything makes it look better! I'm planning on making more of these and adding them to the Etsy shop soon. Let me know if you are interested!
Monday, June 3, 2013
DIY Birthday Banner Invitations
This is the twins birthday month so naturally I am starting to think about a party for them. I came across their invitations from last year and thought I would share them with you. They were a really fun DIY project I thought up after seeing that people actually sew on paper! I LOVE that idea. That's how these Valentine's cards in the Etsy shop evolved too.

Materials
Card stock/envelopes
Printer
Fabric scraps
Sewing machine
Directions
1. Type and print out what you want your invitation to say making sure to leave enough space where you want to sew on your scraps
2. Cut out your scraps into small triangles
3. Line them up on your paper and simply sew right where you want them attached

I made this version at the same time b/c I knew we would be celebrating their birthday again with family after we moved to MI but I didn't know any of the details yet. This was a perfect way to just fill in the information as I decided what we were going to do.

It would be a great idea to make up some of these generic cards and give them as a little gift set to someone, maybe as Thank you cards or "Just to say Hello" cards. Really the possibilities are endless!!!
Time to start really putting some thought into this years party. I'm about to have 2, 2 year olds running around my house. HELP!!!!!!!!!!!
Materials
Card stock/envelopes
Printer
Fabric scraps
Sewing machine
Directions
1. Type and print out what you want your invitation to say making sure to leave enough space where you want to sew on your scraps
2. Cut out your scraps into small triangles
3. Line them up on your paper and simply sew right where you want them attached
I made this version at the same time b/c I knew we would be celebrating their birthday again with family after we moved to MI but I didn't know any of the details yet. This was a perfect way to just fill in the information as I decided what we were going to do.
It would be a great idea to make up some of these generic cards and give them as a little gift set to someone, maybe as Thank you cards or "Just to say Hello" cards. Really the possibilities are endless!!!
Time to start really putting some thought into this years party. I'm about to have 2, 2 year olds running around my house. HELP!!!!!!!!!!!
Friday, May 31, 2013
DIY Frame Project and Blog Party
I am in the process of adding decorations to my walls to make my house look more inviting. I came across prints on Etsy by Katie Daisy that I loved so I splurged and bought a few. She also designed my favorite blog that I follow! Here is one that is now hanging on our stair landing and gives me a helpful reminder as I see it everyday.

Isn't it pretty?! I the frame at Goodwill for $2. Spray painted the wood with white I already had and then spray painted the matting this nice green color that matched perfectly to the print that I also already had! That's a win win in my opinion!


It's Friday so don't forget to check out the Blog Party. Only 1 more week to get more ideas on baby nurseries from these great style contributors.

Here are the other contribors if you want to check out their blogs
Isn't it pretty?! I the frame at Goodwill for $2. Spray painted the wood with white I already had and then spray painted the matting this nice green color that matched perfectly to the print that I also already had! That's a win win in my opinion!
Here it is hanging nicely for me to see every day!
It's Friday so don't forget to check out the Blog Party. Only 1 more week to get more ideas on baby nurseries from these great style contributors.
Here are the other contribors if you want to check out their blogs
- Forever’s Like a Dream- Kelley
- Rhymes with Smile- Katherine
- Design Post – Beth
- Tiffany Leigh Interior Design -Tiffany
- Vivid Hue Home- Heather
- Fancy Free Me- Elisa
Monday, May 27, 2013
I love trash!
It's amazing the beauty that can come from things people throw away! Our room got a rehab entirely out of trash. Doesn't get much scrappier than that! So many years our room felt off... I have found our room the hardest for me to decorate. I didn't want it too girly for Andy's sake. I always lean toward simple, clean and lots of plants! So why for so long did I try everything else?

 |
| He used 2 pieces of pier that washed up on to our beach! Took about 3 hours! |
 |
| Help is plentiful! |

 |
| Thinking of a drop cloth bed skirt... and picking up that shirt...and hard wood floors(= |
 |
| String, pictures and clothespins, we like quick fixes here at Scrappy Love! |
Friday, May 24, 2013
Homemade Bug Spray
The mosquitos are horrible here in MI! Anybody with me? Now that I have kids that want to be outside 24/7 I had to come up with a safe bug spray. I was hesitant to apply regular bug spray b/c of all the chemicals in them, so I did some research on making my own. Let me tell you, there are TONS of homemade recipes out there! I personally decided to go with the cheapest one to make and see if it works, if not I won't feel bad b/c I didn't spend much money on it! I went with this recipe.
It's SO SO SO easy. I'm happy to say too, that the one evening we all used it, not one mosquito bit any of us! Of course I need to test it some more to give you a full report, but I was SO happy with it that night!


It's SO SO SO easy. I'm happy to say too, that the one evening we all used it, not one mosquito bit any of us! Of course I need to test it some more to give you a full report, but I was SO happy with it that night!
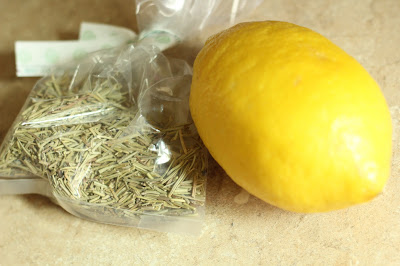
If you have a lemon, rosemary and water, you can make this bug spray!

Cut the lemon into thin slices and chop up the rosemary (1 TBS fresh or 1 tsp dried)

Put the lemons and rosemary into a large bowl and stir to combine

Pour 4 cups of boiling water onto of the lemon/rosemary mixture and allow to cool completely
Strain out the lemons/rosemary

Add to a spray bottle. Done!
Apply all over! It's not sticky and it smells good.
If you decide you don't want to make your own, this is a good chemical free, 100% organic bug spray that is safe for kids. I found this at a local health food store.
And let's not forget the Friday blog party!
 |
| Click to view the featured nursery |
Keep Checking out the other style contributors when you can
Subscribe to:
Posts (Atom)